
Difficulty
Moderate
Steps
43
Time Required
01:00:00
- Bunny Science™ PAPR 43 steps

In Progress
This guide is currently being written. Reload periodically to see the latest changes.
Quiz
0
Introduction
Bunny Science™ PAPR by Guy Kuo, MD
Bunny Science™ PAPR is a specific embodiment of a patent pending Personal Protection Equipment. It is licensed strictly for non-commercial build for frontline workers who don't have commercial PPE.
This is a PAPR (Powered Air Purifying Respirator). It extends use of FDA approved anesthesia viral filters to create a Sealed Compliant Volume PAPR.
• Bunny Science™ PAPR isolates user via positive pressure instead of requiring a perfect face to mask seal.
• Bunny Science™ PAPR extends use of approved, viral filters. These are ubiquitous in the operating room setting and provide N99 filtering for patients.
Design Highlights
- Filters air via FDA approved, ventilator viral filter or medical air/oxygen
- Covers entire head and face against
- Use positive pressure to maintain isolation
- Dramatically lower airflow requirements
- Use disposables that are readily available
Developmental Testing
The Bunny PAPR has been tested at my hospital against nebulized N95 test aerosols for proper isolation. To simulate worst case test conditions, test aerosol was directed at air intake, exhausts, and neck seal. Although, this is not identical to NaCl challenge, there is no logical reason to require re-testing of filters already accepted by FDA as having 99.99% viral filtering.
Physiologic monitoring for CO2 clearance, oxygen saturation, and respiratory rate was verified as sustainable using OR patient monitor and continuous gas sampling analysis. User ability to wear system for 11 hours was confirmed. Wearer has ability to carry out typical operating room procedures, intubate, extubate, monitor, fill out EHR, walk and push gurneys.
Main Project Page
Preparation for Wear
Detailed use and assembly video
BunnyPAPR Playlist
https://www.youtube.com/playlist?list=PL...
Most Recent 3D parts files...
https://www.thingiverse.com/thing:424327...
or
https://www.prusaprinters.org/prints/276...
The Bunny Science PAPR is not yet a regulatory approved device. Use of this PAPR respirator is at your sole discretion and risk.''
License:
Project is a specific parts design for an embodiment of a patent pending PAPR. This specific parts design is published, for humanitarian reasons, under the Creative Commons Attribution-NonCommercial-NoDerivs CC BY-NC-ND with addition of the following conditions:
- The duration of this license ends either 6 months after the emergency proclamation for COVID-19 issued March 13, 2020, by the White House is revoked or ends OR Jan 1, 2022, whichever is earlier.
- All manufactured units fabricated during the duration of this license can continue to be used for non-commercial purposes beyond the time frame of this license for up to 10 years after the date of original manufacture.
Art Credit: Generic human head model by John Brown.
Video Overview
-
-
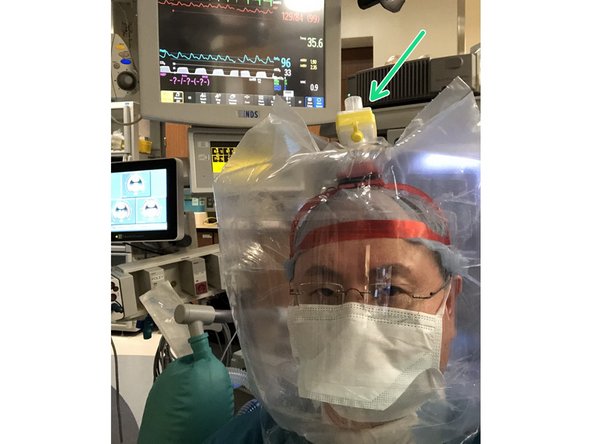
Supply filtered breathing air through approved anesthesia ventilator circuit virus filter.
-
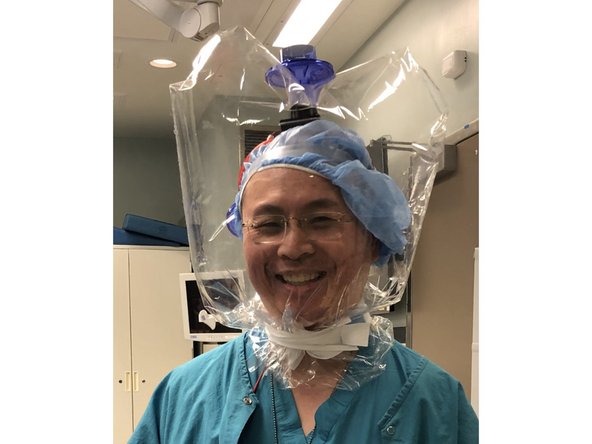
Use non-permeable, yet readily available barrier (plastic bag) as air tight hood protecting entire user head.
-
Provide protection against not only splash, but also highly dangerous aerosolized virus generated during airway manipulations.
-
Use positive pressure gradient rather than material perfection to exclude contaminated room air.
-
No tight fit requirement.
-
Unlike a completely 3D printed mask, does NOT rely on printing perfection to create safety barrier.
-
Preserve cleanliness of 3D parts inside PAPR to facilitate re-use and extended life.
-
-
-
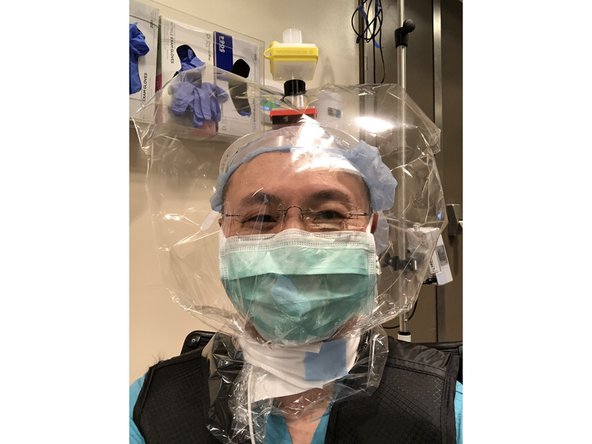
The Bunny Science PAPR is a Sealed Fit Compliant Volume PAPR that provides filtered breathing air in a full head enclosing hood.
-
Uses FDA approved, anesthesia viral filter and fan to filter inspired air.
-
12 volt battery pack or AC adapter drives fan. Fan does work of drawing air through filter and lessens user fatigue.
-
Sealed Fit Compliant Volume PAPR configuration allows four-fold lower air flow than traditional PAPR's. This enables flows within operating range of anesthesia filter.
-
A viral filter must always be used on PAPR's fan intake.
-
-
-
Positive pressure, filtered air inflow maintains isolation just as in a conventional, tight fit PAPR
-
Plastic bag hood protects entire head
-
Comfortable, yet effective seal around neck with personal utility strap.
-
Expiration is via one way valved ports. System is kept under positive pressure. In actual usage, the valves rarely actually need to close.
-
Warning: Do not seal bag until fresh gas inflow and expiratory ports are present.
-
-
-
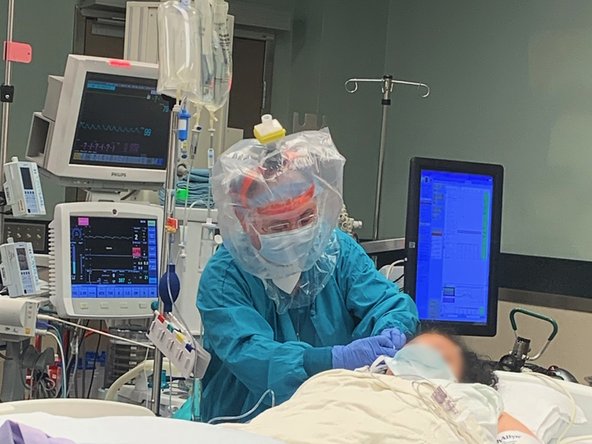
Comfortably worn for 11 hours continuously while performing operating room work including intubation, extubation, line insertion, regional block placement, EHR documentation, and patient transport.
-
Greatly improved comfort compared to an N95 mask, being free of a super tight mask and no longer sucking air through mask.
-
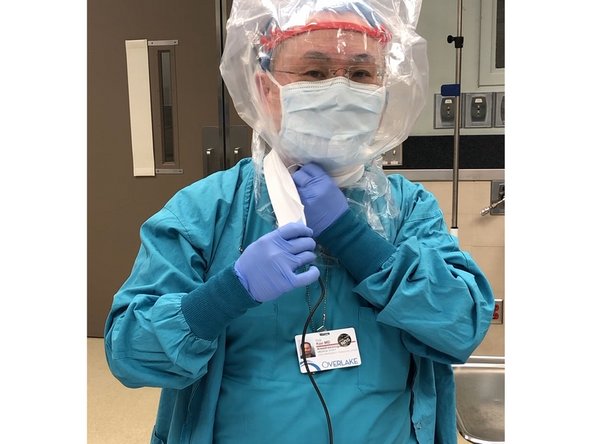
If configured with filters on both inflow and outflow, surgical mask can be omitted. Completely frees face to receive cooling airflow.
-
Low 200 gram mass feels similar to a baseball cap during use. Even after 11 hour wear, facial skin unaffected unlike after a tight face mask.
-
Inspiration is without effort. Fan does the work of pulling air through filter.
-
-
-
Bag needs to be large enough and well sealed. Many readily available polyethylene bags are usable.
-
Adequate seal and gas flow are readily readily monitored by bag's positive pressure inflation.
-
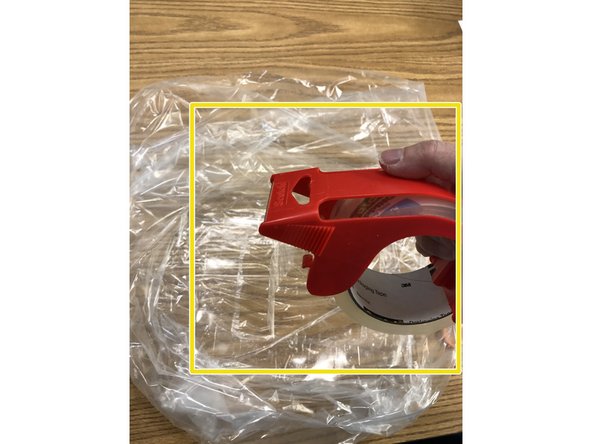
View window is easily added to any bag using packing tape and a piece of transparent plastic sheeting such as laser print film or scavenged mask visors.
-
Because Bunny PAPR uses a large volume, compliant bag, wearer can take full size breaths. As a positive pressure system, wearer is also spared the work of pulling air through a filter.
-
Clear presentation covers are an excellent, stronger and more optically clear alternative to laser transparency sheets. 8.5 x 11 inch cover makes two large view windows.
-
-
-
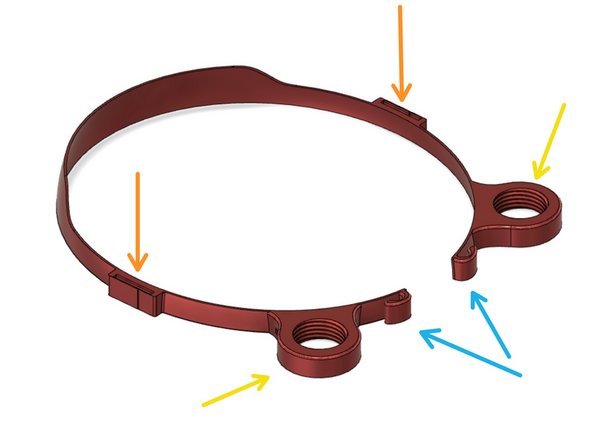
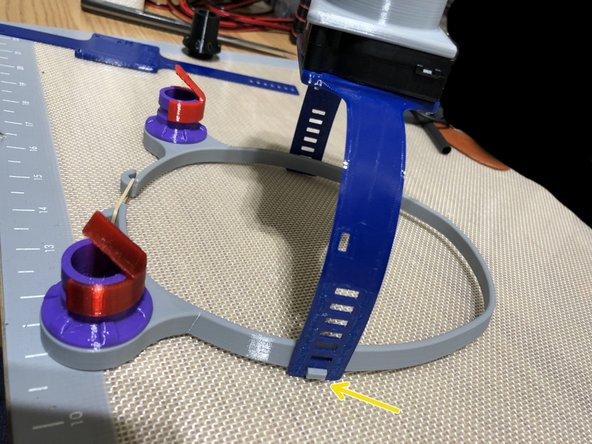
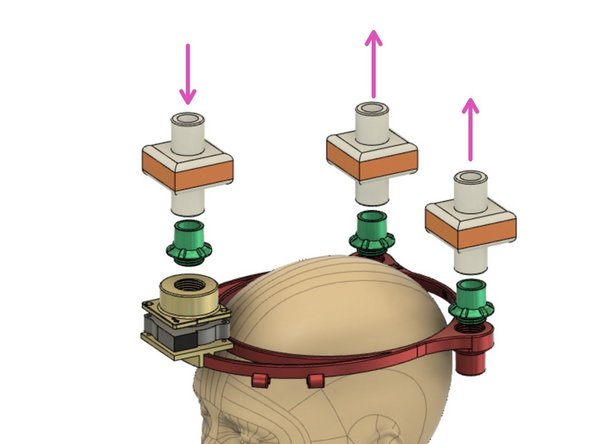
Loop flexes to conform to most head sizes.. Hooks in rear of loop allow elastic bands for preferred tension and size.
-
Mounting slots for top of head, 51 mm blower fan mounting band. Insert and click band into position.
-
Expiratory ports for flutter valves
-
Hooks for tension band.
-
Oxygen supplied configuration is deprecated. Latest Bunny PAPR's omit O2 tubing clips.
-
-
-
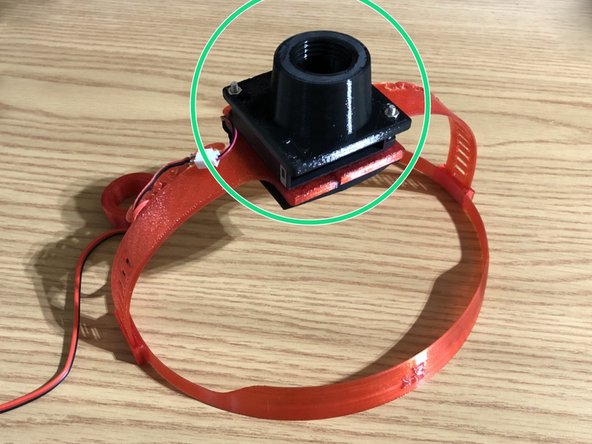
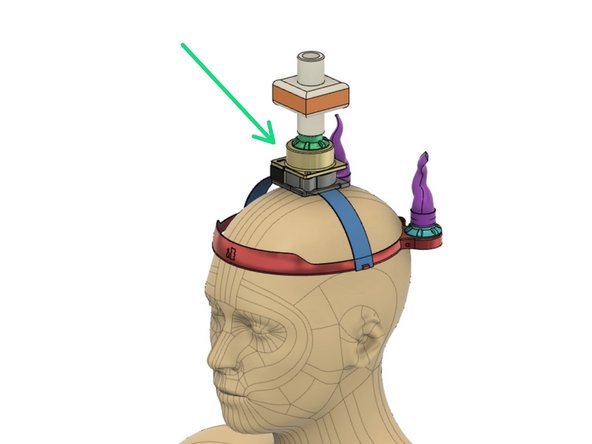
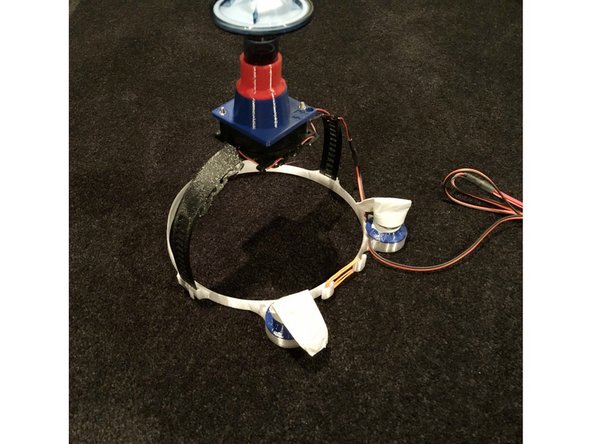
Blower fan is mounted atop height adjustable band
-
Band inserts into mounting slots on each side of loop. Insert into slot and click to desired height.
-
Current mounting slots are tilted slightly forward to improve air circulation pattern.
-
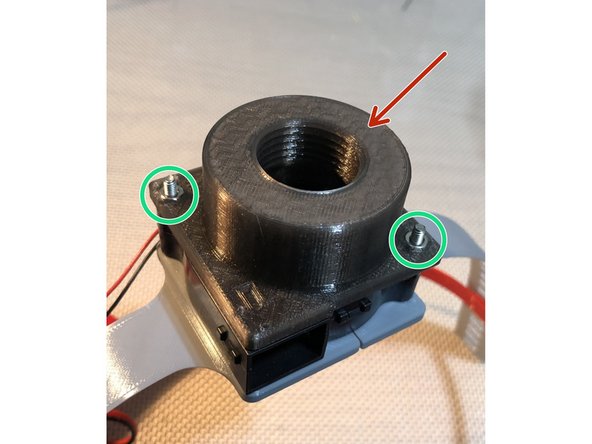
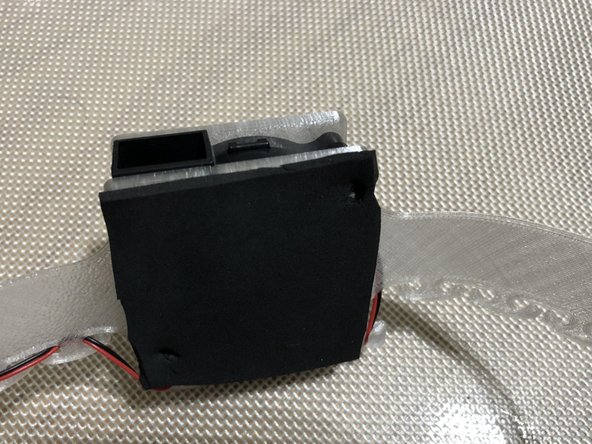
For those needing to wear the PAPR for prolonged periods, adding a thin piece of neoprene foam below the fan mount improves comfort. You can see the edge of black neoprene under the fan mount. Bolts pass through the neoprene and hold it in place.
-
-
-
Expiratory flow can be through filters or through one way flutter valves. These screw onto the loop and create an airtight, penetration through the bag.
-
Flutter valves are fashioned from a cut-off glove finger rubber banded onto Flutter Valve Penetrator. End of finger is cut to allow air exit, but stop reverse inflow.
-
Bunny PAPR with correct inflow rate maintains continuous positive pressure. The flutter valves should rarely if ever need to close.
-
Test that your airflow and expiratory fittings configuration maintains bag inflated even during inspiration The bag should only collapse inward about 1 cm.
-
-
-
A fan draws room air through an anesthesia viral filter to fill the hood bag. Full mobility is possible with a 12 volt battery pack.
-
51 mm blower fan with 200 pascal static pressure yields about ideal flow. 150 pascal static pressure capacity is probable minimum that allows unencumbered activity.
-
Always verify your Bunny Science PAPR maintains positive to neutral pressure during inspiration. Bag should freely move inward about 1 cm during inspiration. Never modify design to stent bag open. Stenting bag open risks generating negative pressure.
-
51 mm blower fan provides adequate air clearance and permits walking and stair climbing. I have spent hours in the Bunny PAPR with gas sample monitoring to verify flow adequacy.
-
Alternative configuration is to replace both flutter valves with another two anesthesia viral filters or a single VBMAX48 filter. This allows use of Bunny Science PAPR in sterile environments without need a surgical mask inside PAPR.
-
-
-
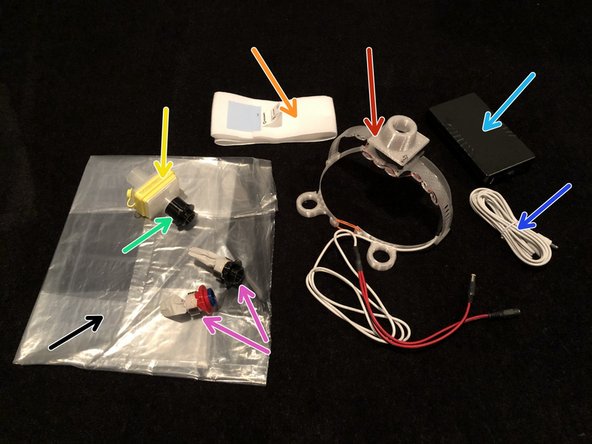
Loop with fan mounted. Latest Bunny PAPRs position fan up top for better weight distribution.
-
Plastic bag with view window
-
Bag flutter valves x 2
-
Bag filter 22 mm adapter
-
Anesthesia circuit virus filter
-
Personal utility strap to secure bag around neck. Any quickly released wrap is usable, but wider, softer and easier release all add to comfort.
-
12 volt battery pack and/or 12 volt AC adapter. Use standard 5.5/2.1 mm DC barrel connectors with positive center pin for widest compatibility. If both male and female connectors are wired in parallel, user can switch between AC adapter and battery pack by plugging in desired power source.
-
DC extension cable 10 to 20 feet. Allows freedom of movement when simultaneously charging battery and running PAPR fan.
-
-
-
A-M Systems VB48Max viral rated PFT filters is my current preferred filter for BunnyPAPR. It has 99.99% viral reduction and MUCH lower flow resistance than any anesthesia circuit filter. Nearly doubles airflow compared to anesthesia filters.
-
Mount using the VB48Max filter adapters instead of usual 22 mm filter adapter.
-
Best configuration is using two filters. One VB48Max on inflow and ONE outflow with a VB48Max. This removes need for flutter valves and filters both inspired and expired gas. With dual direction filtering, a surgical mask is no longer required.
-
Surgical mask free and double the airflow makes this a very comfortable configuration.
-
Viral Filters (AM-systems VB48max) https://www.a-msystems.com/p-1160-vbmax-...
-
-
-
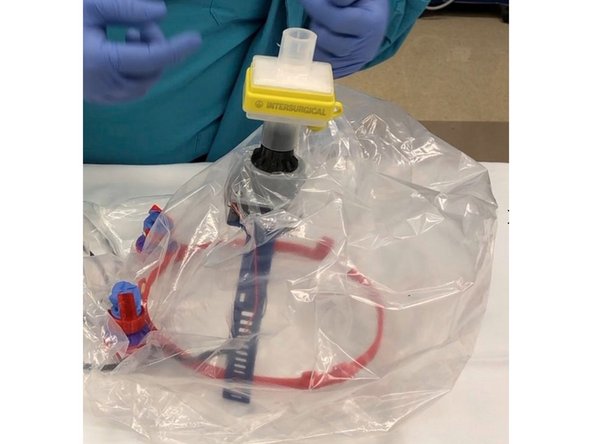
Preassemble Bunny Science PAPR with fittings and bag.
-
Recheck fenstrations are actually open through bag.
-
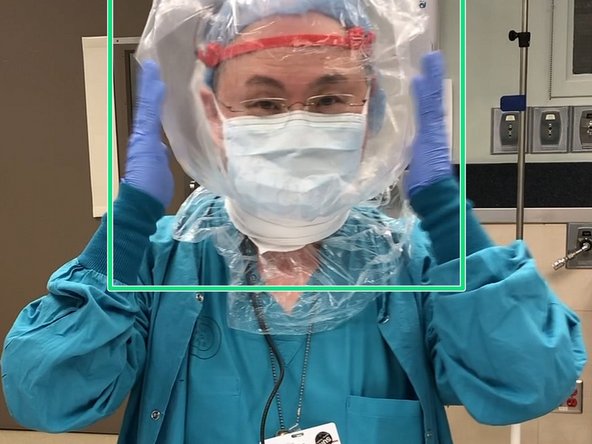
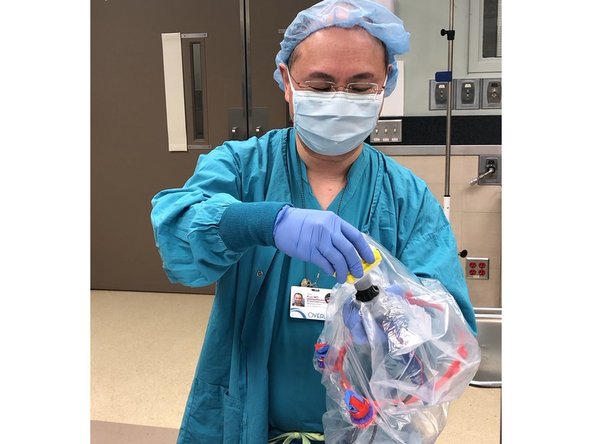
Turn on fan power. Close the open end of bag and verify the bag inflates.
-
Arrange bag neatly around neck leaving ample slack in front of your face for inflation. Secure around neck with soft, personal utility strap.
-
Do not over tighten neck strap! It only has to be tight enough create a positive pressure seal.
-
-
-
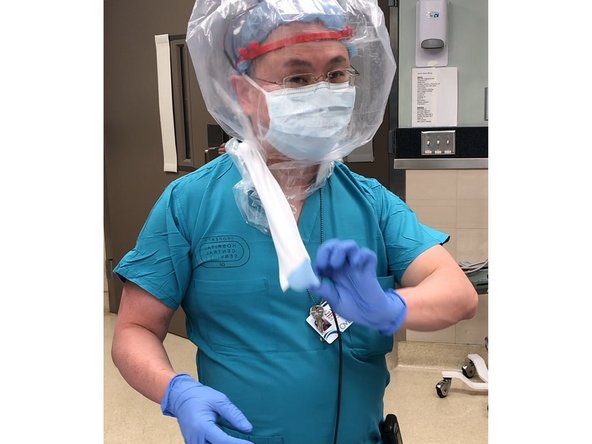
Wear gloves
-
Lean forward at waist.
-
Remove and dispose of neck strap
-
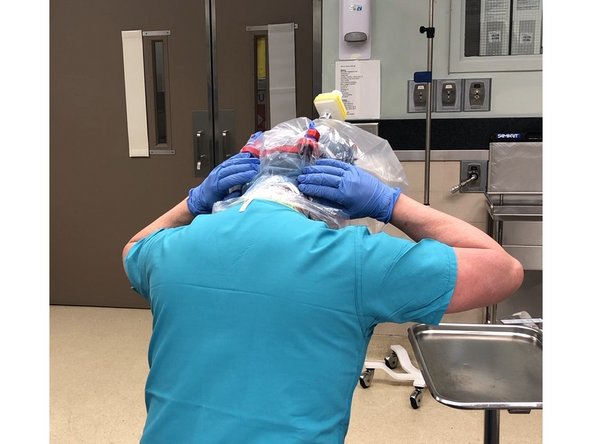
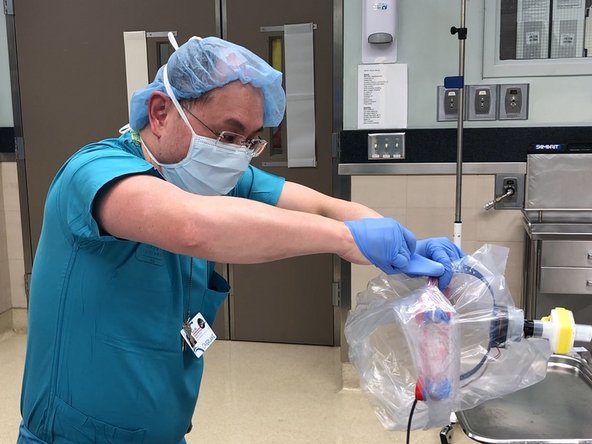
Grasp bag exterior near its rear edge. Without letting go the bag, evert and pull rear edge of bag upward to form clean cuff in posterior. Pull and evert enough to bring edge of bag to top of head.
-
Grasp loop through bag.
-
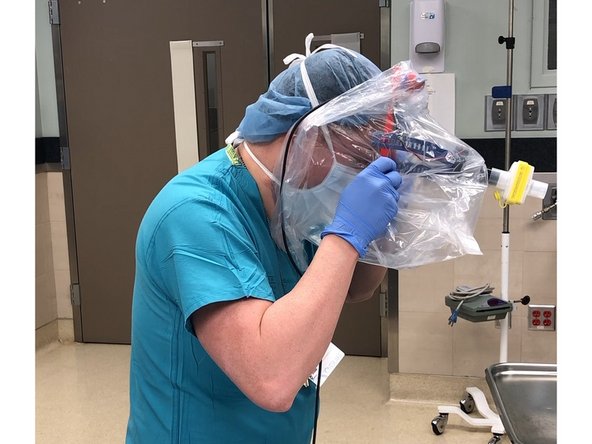
Remove loop and bag together by tipping them forward and off your head.
-
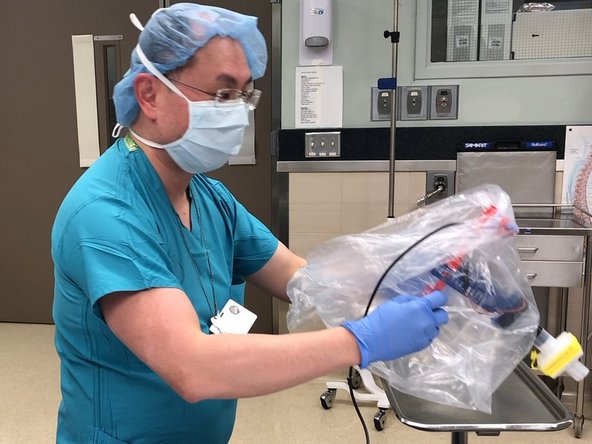
You are now holding the PAPR by the dirty, outside of the bag.
-
-
-
Use glove-in-glove technique to remove one glove. Ungloved hand is your clean hand.
-
Turn off fan with clean hand.
-
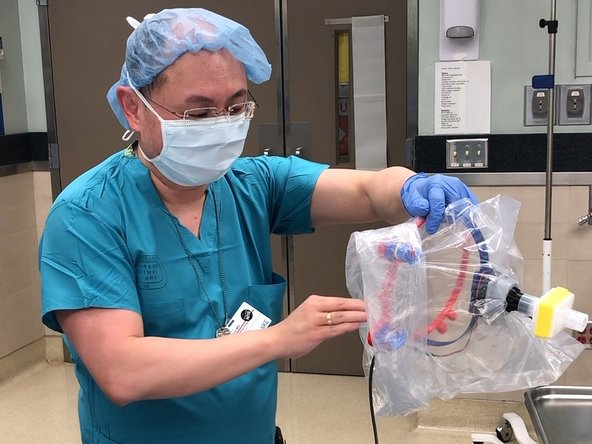
Reach into clean side of bag with clean hand and grasp loop.
-
While holding loop with clean hand, unscrew penetrators with dirty gloved hand. Place penetrators in designated dirty disinfection container.
-
Free bag from Bunny PAPR and dispose of bag
-
Place PAPR in clean disinfection area.
-
Remove dirty glove with hand in glove technique.
-
Perform hand hygiene.
-
-
-
Sadly, best practice is limited to the physically possible.
-
Even anesthesia virus filters could fall into short supply. Depending on the situation, it may become necessary to reuse a virus filter in the Bunny PAPR configuration.
-
Doffing procedure can be modified to include wiping down the exterior of the virus filter with antiviral, removing filter and wiping its ends. The intake end should always be considered contaminated. Fortunately, viral filters will fit on 22 mm taper in only one orientation..
-
Alternative doffing process is to advance clean thumbs into bag and evert bag completely. This puts dirty side of bag inside and facilitates a later re-donning. Scenario might be usage at start and end of case. Conserves materials, but free end of bag must be wiped before re-donning.
-
Re-donning is higher risk strategy. Carefully weigh risk vs materials availability.
-
-
-
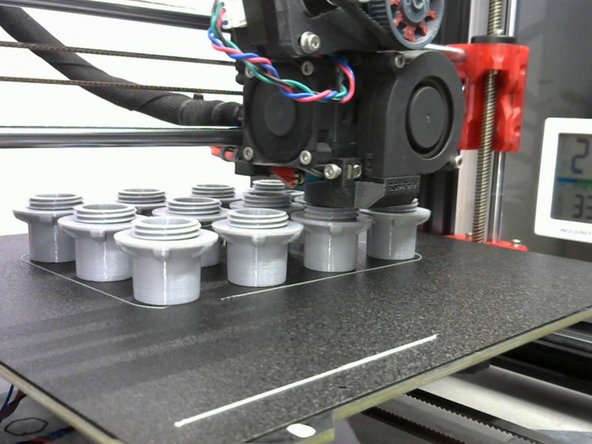
Bunny PAPR and its fittings are made via 3D printing. The loop, fan mount and fan flange remain inside the bag and are reused after cleaning
-
Bag penetrator filter adapter and flutter valves are outside the bag and must be replaced or sanitized between uses. Soak PETG parts in 70/30 IPA x 5 min+ if reuse is desired. Ideal is to print enough penetrators so they can be single use.
-
3D print files for the Bunny PAPR are available at https://www.thingiverse.com/thing:424327...
-
2nd repository at https://www.prusaprinters.org/prints/276...
-
I print PETG with higher temperature than usual to enhance interlayer fusion. My usual nozzle at 255C/260C, bed 85C/90C, 0.2 mm layer height, 3 perimeters, 4 top / bottom layers, 20% gyroid.
-
-
-
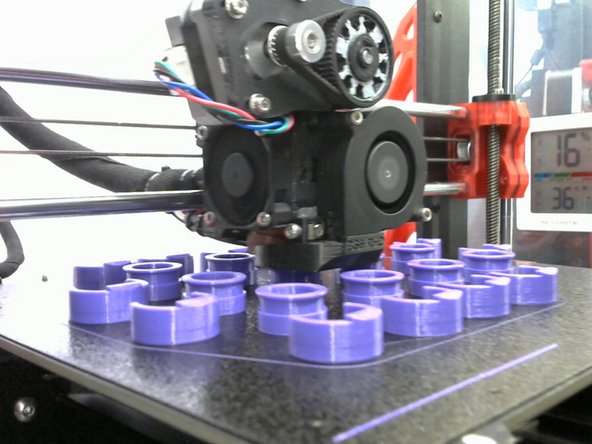
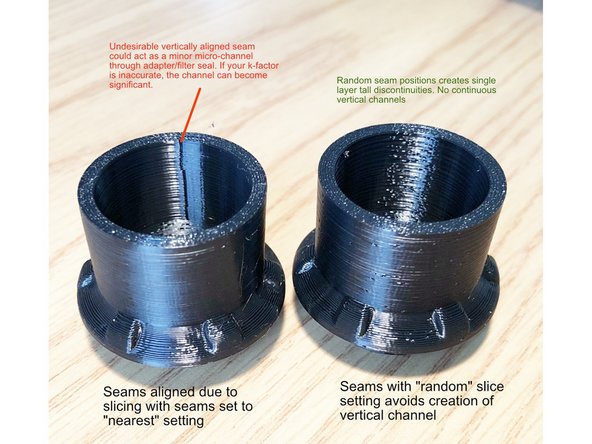
IMPORTANT SLICING SETTING for just the bag filter 22 mm adapters. Part of filter adapter runs negative pressure. We want the seal between filter and adapter to be as good as possible. Everywhere else is positive pressure and has non-critical seal.
-
For the bag filter 22 mm adapters set slicer z-seam positions to RANDOM. Otherwise, your slicer may align seams and create a vertical seam that could act as a microchannel through the adapter/filter seal. Setting seams to random avoids creation of a continuous vertical seam.
-
Vertically aligned seams are particulary large if your slicer's k-factor does not match your FDM printer.
-
VB48Max Filter Adapters allow use of very low resistance A-M Systems. One filter input and one on output for output. Yields much higher flow than 22 mm anesthesia filters and filtering both input and output permits wear without surgical mask.
-
-
-
Experienced 3D printers will note this project requires minimal post print processing. Do inspect prints for stringing and remove fine stringing with heated air. Remove burrs as needed. 3 mm bolt passages are easier to use if one runs a 3 mm drill through them before assembly.
-
I have intentionally designed to allow operation without tight tolerances. Nearly the entire Bunny Science PAPR runs under positive pressure making even FDM manufacture practical.
-
Consider lapping the top of fan flange so bag filter 22 mm adapter seats more cleanly.
-
Fan attaches to its mount and flange via M3 screws and nuts. Length of screw should be 5 mm longer than fan thickness.
-
-
-
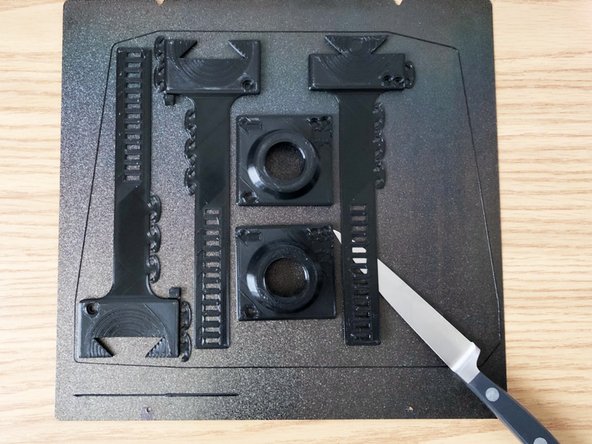
Fan mounting bands have long thin portions. Simply popping off part by flexing plate can fracture the bands near the thicker portion of part.
-
Best procedure is to free the band portion first. Do so by sliding a thin (but not super sharp) knife under end of band. Advance blade to within 3 cm but not all the way to the thick part.
-
Once most of thin band portion is freed, you can safely deplate the parts with usual removal technique
-
-
-
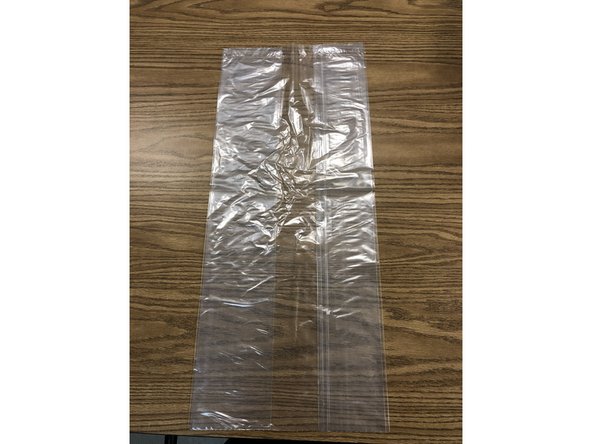
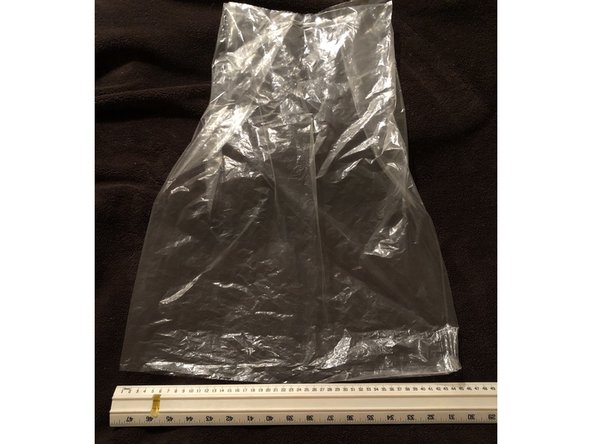
Bag must be strong, flexible, and well sealed. Many polyethylene waste bags are suitable. They do NOT need to be transparent. One can add a view window easily.
-
Size is not super critical. It merely needs to easily fit the diameter of the loop and extend to shoulder.
-
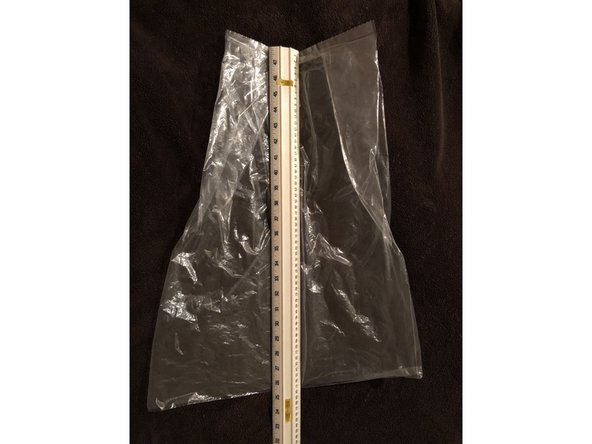
My operating room has near perfectly sized waste bags in good abundance. They are 57 cm long x 45 cm wide
-
Art display sleeves were tested due to their excellent optical clarity. Unfortunately, their plastic tears far too easily and end seams were fragile.
-
-
-
Lay plastic bag flat on table. Bag must be well sealed, wide enough to loosely fit PAPR and long enough to reach shoulders. Sealed end of bag is top. Polyethylene "kick bucket" liners are nearly perfect size and strength..
-
Most bags are not transparent enough, but we can easily add a clear window. Any optically clear plastic sheet will work. For instance, a laser printer transparency sheet yields four usable windows.
-
Place window at desired location. Allow sufficient space between sealed "top" of bag and window. About 20 cm works, but adjust to position window in front of eyes.
-
Tape around periphery of window with clear plastic shipping tape. Overlap 1 cm of the window taking care to create a good seal.
-
Turn bag inside out and lay it flat. Carefully cut away the plastic overlaying your window. Try to cut nearly to edges of the window.
-
Apply tape to overlap the window again to create a window that is taped securely to the plastic bag on both inside and outside. Once taped, turn bag right side out.
-
-
-
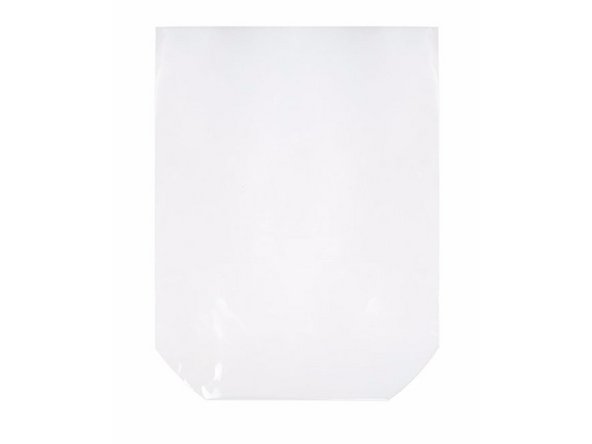
Clearbags.com makes crystal clear, round bottom bag that is suitable for use without need for adding a window. It is made of OPP plastic which is less flexible than polyethylene
-
-
Their OPP plastic is a bit stiffer than polyethylene and crinkly noise occurs, but otherwise functions very well.
-
Technique for putting in penetrators is different for OPP. The plastic doesn’t stretch as much as polyethylene, so you can’t thread penetrators in all the way without cutting the fenestrations. Instead, one must thread in about 1/3 of way. Then cut fenestrations before threading in rest of the way.
-
The bag is a smaller diameter than my customary "kick bucket" liners. Always position filter fenestration BEHIND the bag's seam. 3 to 4 cm allows sufficient space between face and bag for proper airflow.
-
-
-
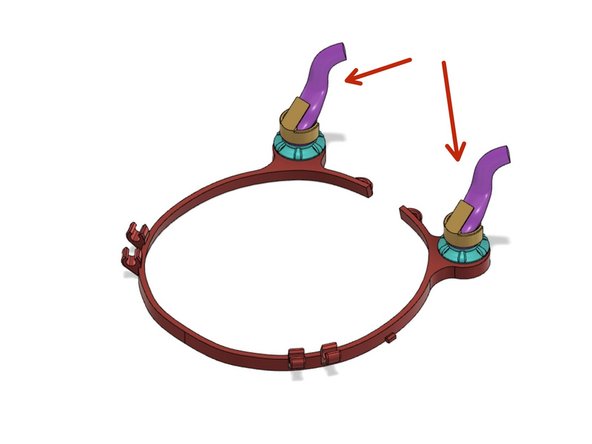
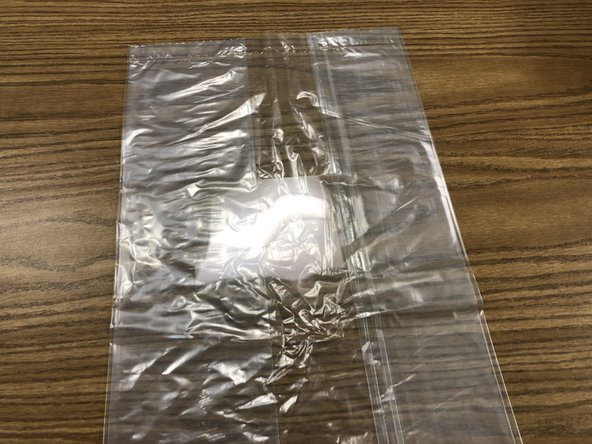
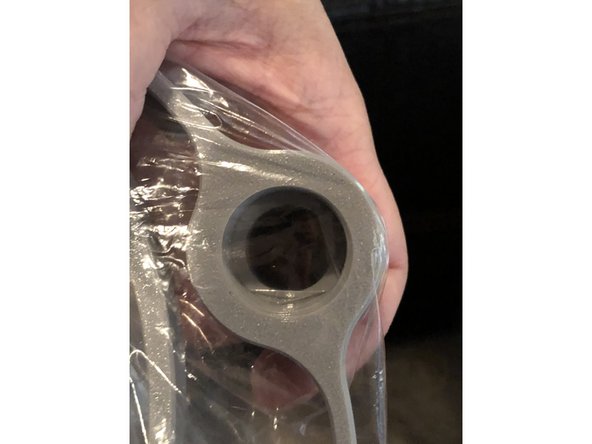
Bag penetrators create air tight passage through plastic bag. Their special sized threading avoids damaging bag material as they screw into place.
-
Bag Penetrator 22 mm Adapters pass filtered air into the Bunny PAPR. Their tapered end fits standard 22 mm ID fittings.
-
Bag Penetrator Flutter Valves pass expired gas out of the PAPR. Flutter valve provides additional user protection beyond continuous positive pressure differential.
-
Do not precut openings in your bags before screwing in penetrators. Penetrators have a double sealing action. Bag plastic is not just sandwiched between the flat parts of penetrator and its port. It is also deformed and molded between the special sized threads to seal like thread tape. Single mode sealing is likely sufficient, but both is best.
-
-
-
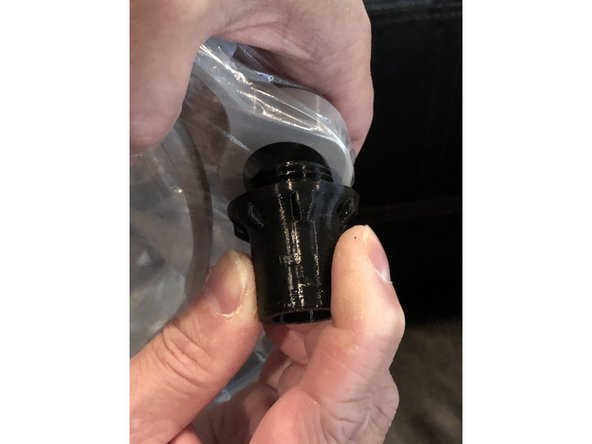
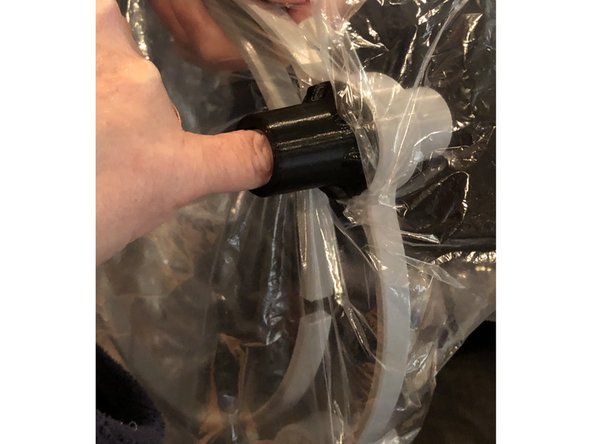
Flatten plastic bag over threaded port.
-
Screw in penetrator while keeping plastic lightly stretched flat.
-
Fenestrate plastic after penetrator is tight.
-
If using bag made of stiffer material like transparent OPP instead of softer polyethylene, you will need to fenestrate bag once penetrator is half way threaded rather than after fully screwing in penetrator.
-
-
-
Although you can partially fenestrate the plastic with just a fingertip, doing so often creates a smaller passage due to the plastic's elasticity. Improve airflow by slicing away plastic open with a blade and/or tearing out excess plastic with hemostat.
-
Flow changes by r^4. Fully opening fenestrations is very helpful especially at the fan intake.
-
-
-
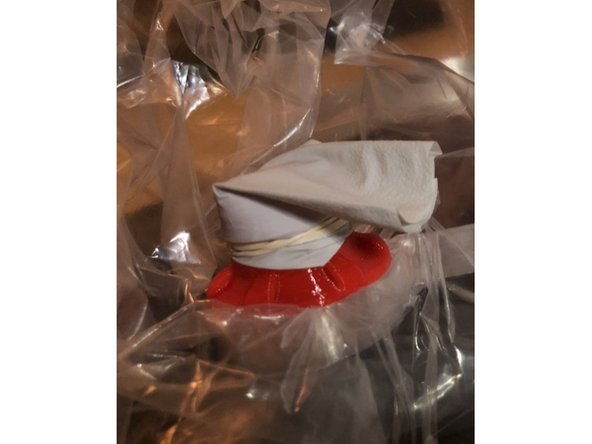
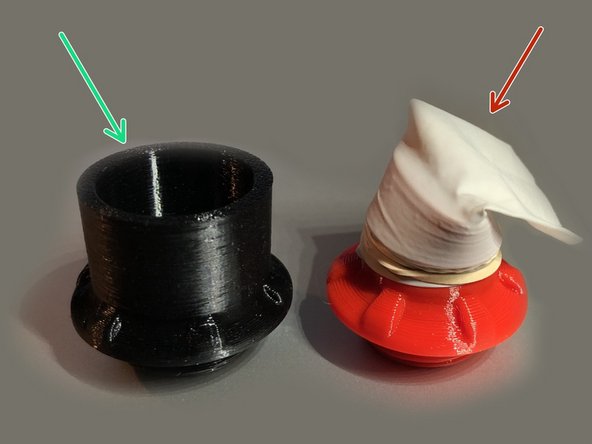
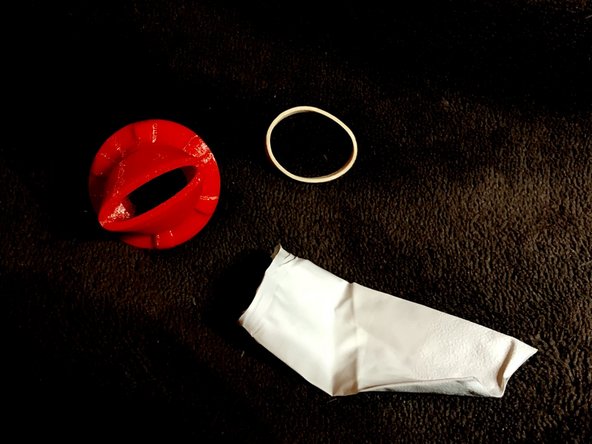
You will need a large or medium exam glove, rubber band, a bag penetrator flutter valve fitting, and valve deflector.
-
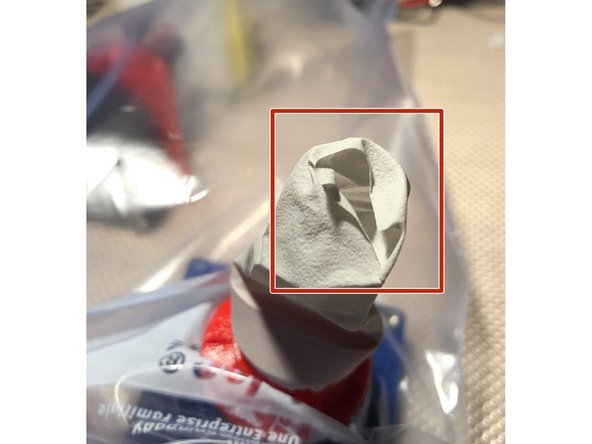
Cut one of the longest fingers from glove. Select one that is free of wrinkling and creasing near its tip. If the tip has severe creasing or wrinkles, the valve will never shut properly. 2nd pict shows the badly wrinkled end.
-
A non-wrinkled end, thinner glove material, and longer finger create a more effective valve.
-
See video https://youtu.be/FL7E_8VEMfE for additional explanation about flutter valve function.
-
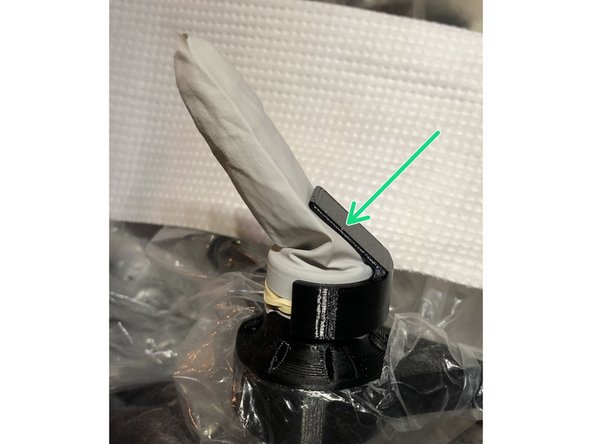
Cut one of the longest fingers from glove. Stretch its open end over flutter valve fitting. Note the glove finger has a natural flatness. Align flatness of glove finger with long axis of valve ellipse.
-
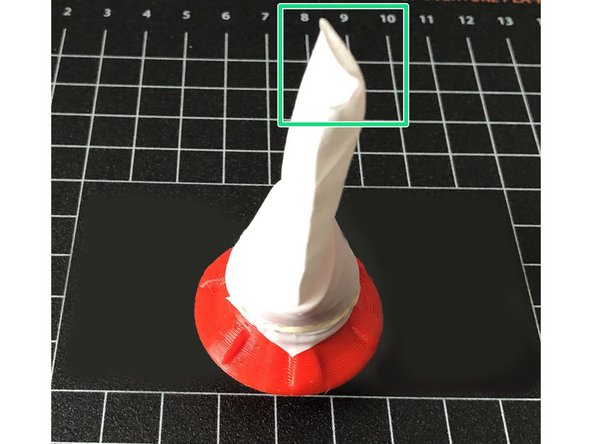
Ensure glove finger is advanced past the groove. Secure with a rubber band in the groove.
-
Cut off part of rounded tip of glove finger. The size of cut should be between 10 and 15 mm long. Smaller yields more pressure but less flow. Too large a cut and pressure will be too low. If finger is cut properly, its end should naturally be flat and nearly closed in absence of airflow.
-
Valving action is not intended as the primary inflow protection. Continuous positive pressure is the main protection, but valving is important in case user takes a very large, forceful inspiration and greatly deflates bag.
-
-
-
With correct combination of blower fan and output flutter valves, flow through PAPR is 20 to 35 L/min. In that flow range, there should be little to no fogging during non-strenuous activity.
-
Most common cause of fogging is incomplete fenestration of bag penetrations. Check that filter and expiratory penetrations through bag are fully open.
-
Applying F.R.E.D. defogger to inside of window is helpful if you still find fogging to be an issue.
-
-
-
There must be sufficient flow and output resistance to maintain positive pressure 20 pascale or higher between breaths and never negative during inspiration. Also, total airflow must be 20 LPM or more for adequate CO2 clearance.
-
I recommend a blower style fan with 200 to 250 static pressure, and viral filters having 3 cm H20 or less flow resistance at 60 LPM. Viral filters with 1.5 cm H20 or lower resistance at 60 LPM are desirable for larger users.
-
Fan shall be oriented to pull air in through filter and vent into bag
-
Bag is intentionally NOT stented open. We want the bag to readily collapse. This prevents development of negative pressure during inspiration.
-
Valves are never instantaneous. Configure your air intake and expiratory fittings to maintain positive to neutral pressure even during inspiration.
-
Do not massively increase fan power. Keep total liters/min flow to about 20-40 L/min to remain well within anesthesia filter performance envelope.
-
-
-
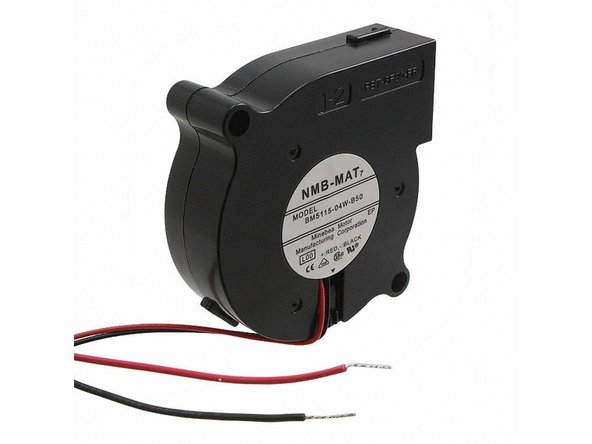
Use a 12 volt blower fan with at least 150 pascal static pressure
-
My original recommended NMB Technlogies BM5115-04W-B50-L00 blower fan static pressure of 0.803 in H2O (200.0 Pa) provided ample airflow (30 L/min with Intersurgical Hydromax HMEF) . However, this fan is now sold out.
-
San-Ace 109BC12GC7-1 https://www.digikey.com/product-detail/e... is good alternative if user needs higher flow (33 L/min, 60 dBA against HMEF)
-
Sunon MF50151VX-B00U-A99 is also good fan for BunnyPAPR. (33 LPM , 63 dBA) Same flow as San-Ace, slightly louder, but lower cost. https://www.digikey.com/product-detail/e...
-
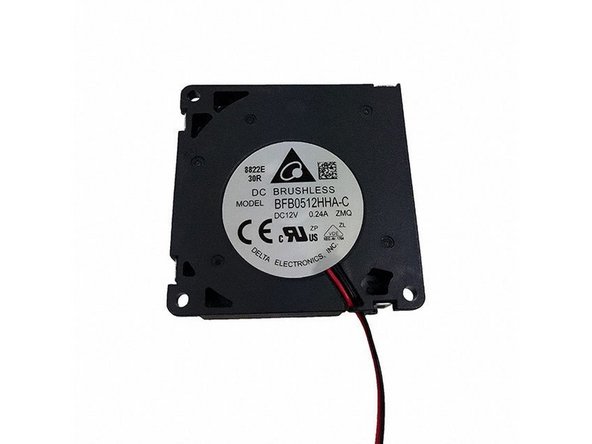
http://d.digikey.com/HS000xU3ppttIK40NAX... Delta BFB0512HHA-CZMQ is lower flow, quieter (20 L/min 55 dBA under HMEF resistance). This fan is ideal for <80 kg users. Its mounting holes must be enlarged for 3 mm bolts. I have worn this in OR for 11 continuous hours. Steady state EtCO2 was 40 with this fan and Intersurgical Hydroguard Mini.
-
Some fans have correct looking specs but falter during testing. For instance, Mechatronix B5015E12B-BSR achieved only 22 LPM but was a loud 65 dBA.
-
If you try other fan model, always verify flow rate against your HMEF's resistance is 20 to 40 L/min and pressure is at least 20 pascal. Larger users will need 30 L/min. Check EtCO2 levels via gas sampling for at least 20 minutes to verify steady state value < 42 mm Hg..
-
-
-
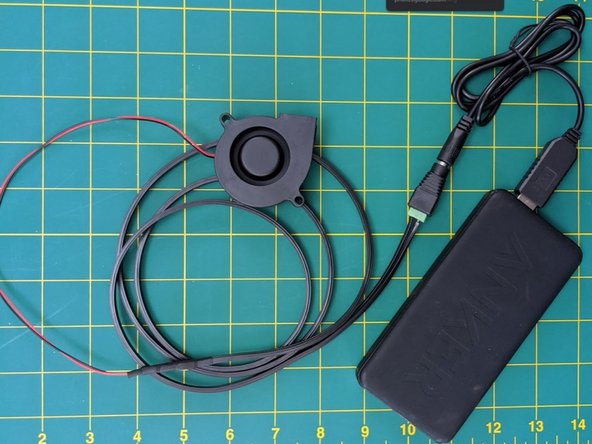
Wire fan with sufficient lead to reach from user head to rear pocket. Secure wiring to Bunny Science PAPR's loop.
-
Placing both male and female connectors allows use of either battery pack or AC adapter.
-
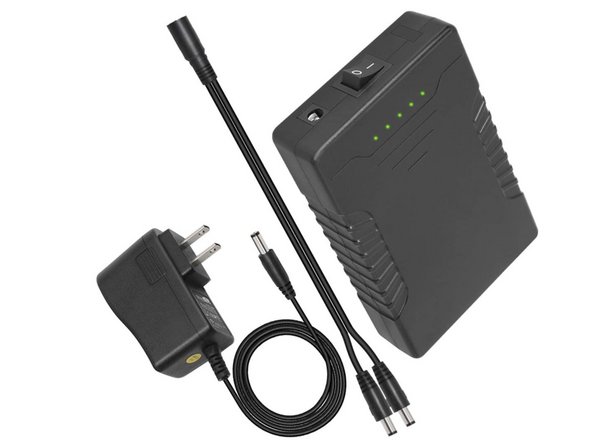
6000 mah lithium 12 volt battery pack with charger https://www.amazon.com/gp/product/B00ME3...
-
Alternative 12v 6000 mah battery pack. Amazon delivery times can vary with battery pack ordered. https://www.amazon.com/Talentcell-Rechar...
-
Check usage directions of battery pack. The ones I link have oddity of charging ONLY if its power switch is ON! Leave the switch off and pack won't charge.
-
DC Barrel Connectors 2.1 x 5.5 mm https://www.amazon.com/gp/product/B072BX...
-
DC extension cord permits easier movement when simultaneously charging battery while running PAPR fan. https://www.amazon.com/gp/product/B01J5R...
-
-
-
USB battery pack can also be used if combined with a DC converter to boost voltage from 5 volts to the fan's required 12 volts.
-
Courtesy of the McGyver PPE team,
-
See commends by Howard Chong below for parts and links.
-
Pass through charging may not be possible for most USB battery packs. If this route is taken, obtain three packs. One in use, one fully charge, one being charge.
-
-
-
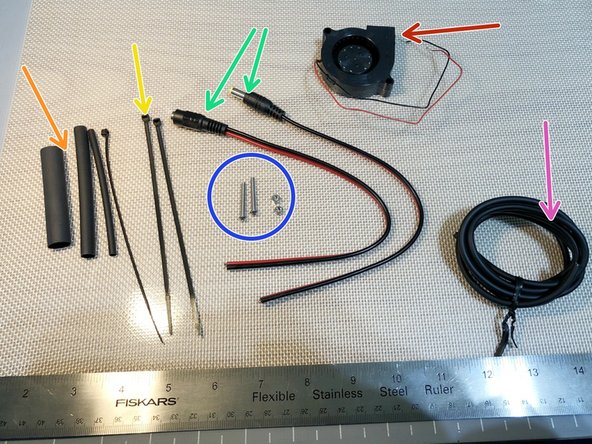
51 mm blower fan, 12 VDC, 150 to 250 Pas static pressure capable
-
Two conductor, flexible wire cable 120 cm long (about 4 feet)
-
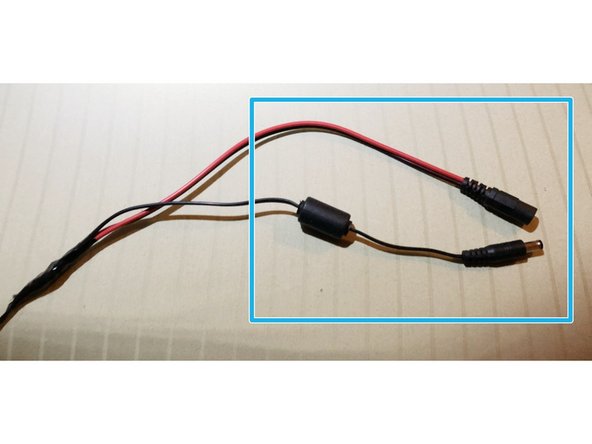
DC barrel connectors 2.1 x 5.5 mm with pigtails. Both male and female are used.
-
M3 x 25 mm screws and nuts (two each). Length of screw will vary if fan thickness changes.
-
Three zip ties (optional with current PAPR design)
-
Heat shrink tubing. Three sizes to insulate smaller wires and overall cabling.
-
-
-
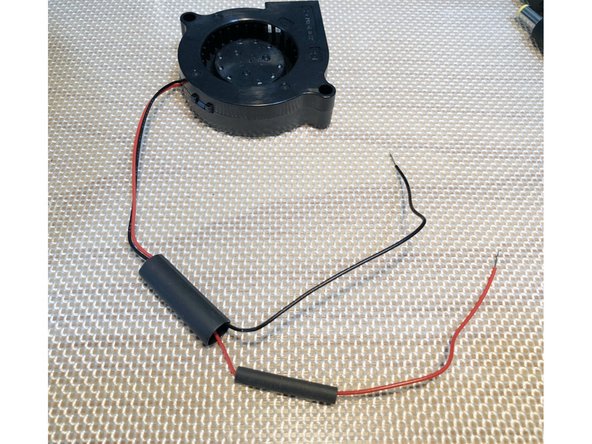
Place large diameter tubing over both positive and negative leads of fan leads.
-
Place smaller tubing over just positive fan lead
-
Twist together DC pigtails to wire them in parallel. Positive with positive. Negative with negative.
-
Large shrink wrong over both pigtails
-
Smaller shrink wrap over positive DC wires
-
-
-
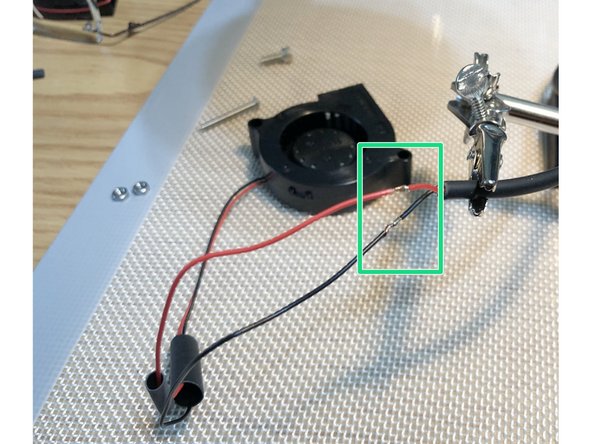
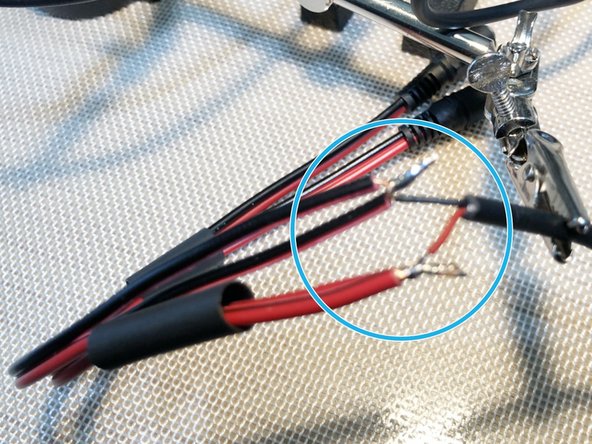
Solder fan leads to cable.
-
Solder DC barrel pigtails to cable
-
Maintain polarity. Red lead of fan wires to center (red) of DC barrel connectors.
-
-
-
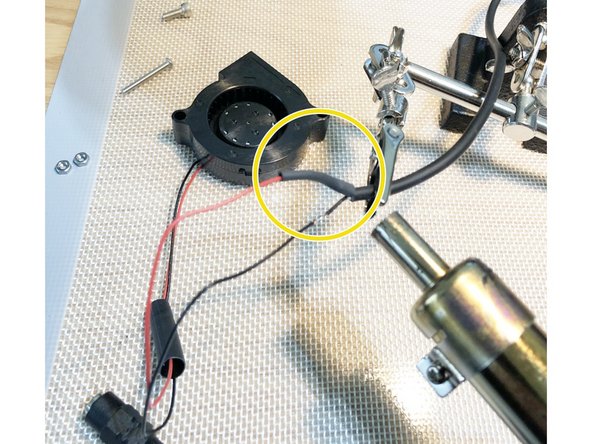
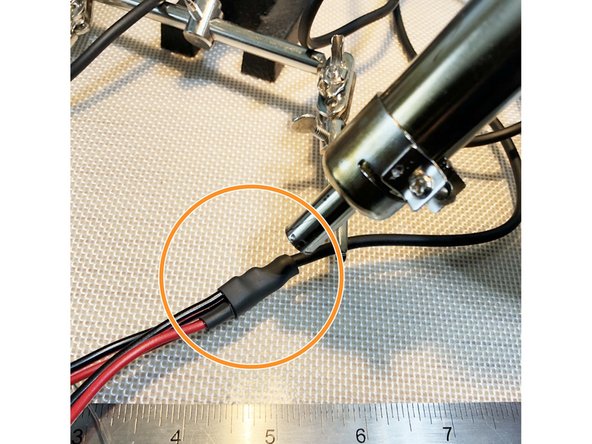
Insulate fan positive soldering joint with smaller heat shrink tubing.
-
Insulate fan negative soldering joint with larger heat shrink tubing. This larger tubing will also cover inner shrink wrap
-
-
-
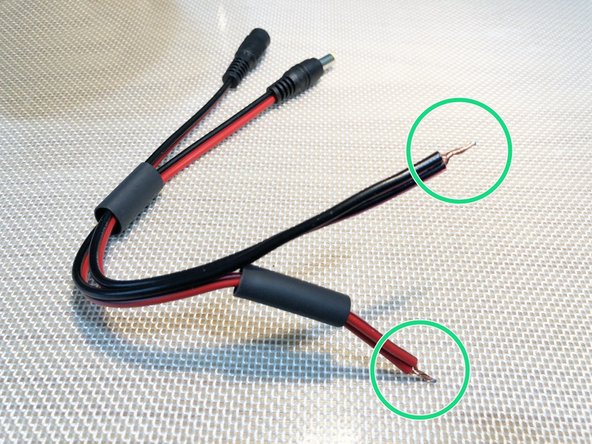
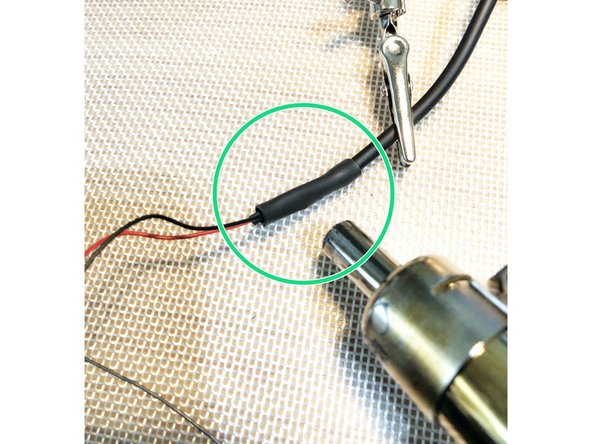
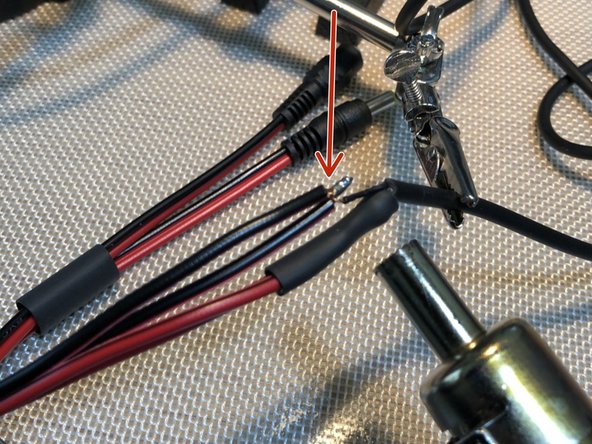
Insulate positive leads with smaller heat shrink tubing.
-
If you make pigtail splices, as in this example, cut one pigtail shorter than the other or bend in opposite directions. Otherwise you create a shorting risk
-
Insulate negative leads and overall join with larger heat shrink
-
-
-
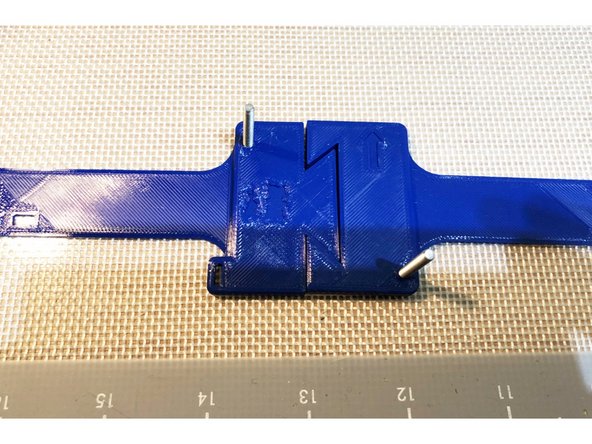
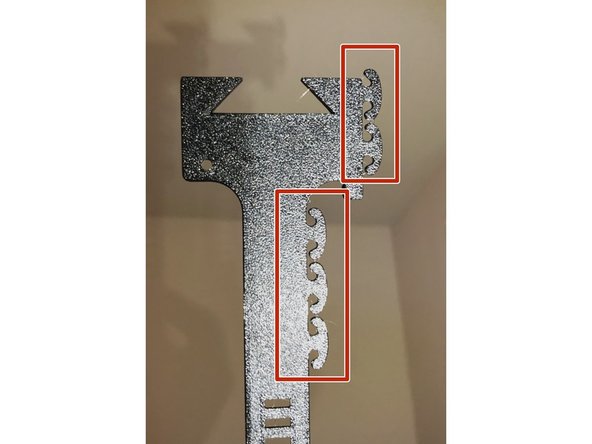
Bunny PAPR Flex Fit places fan on top of head via a banded mount. (Band is in two halves so can fit print plate)
-
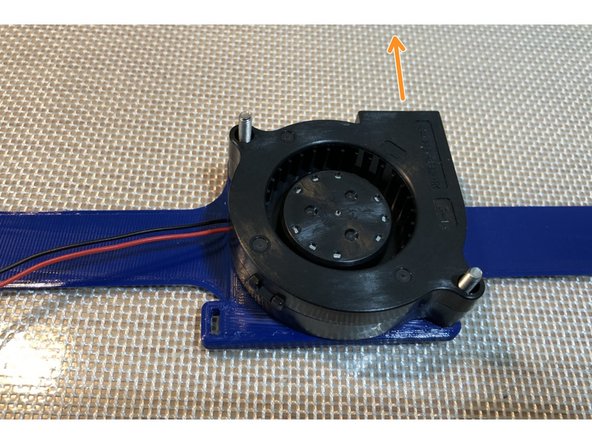
Arrow indicates forward direction for airflow and fan outlet.
-
Insert bolts from below mounting band halves. Position the two halves interlocked with bolts facing up.
-
Orient blower fan with output facing in same direction as arrow (forward)
-
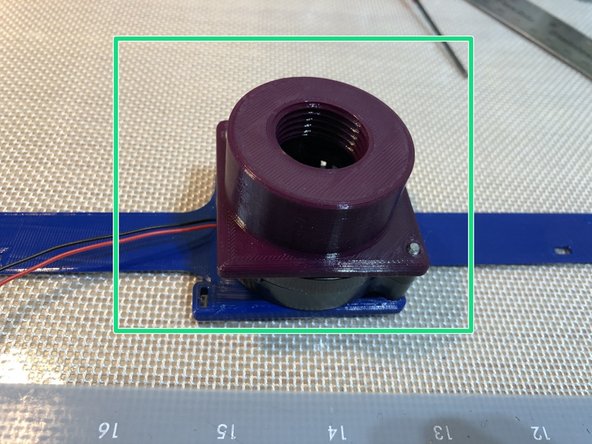
Add fan flange and secure with M3 screws and nuts. Once screws are tight, the two band halves will remain together
-
Flange can fit in two orientations, but notice arrow indicates correct orientation.
-
-
-
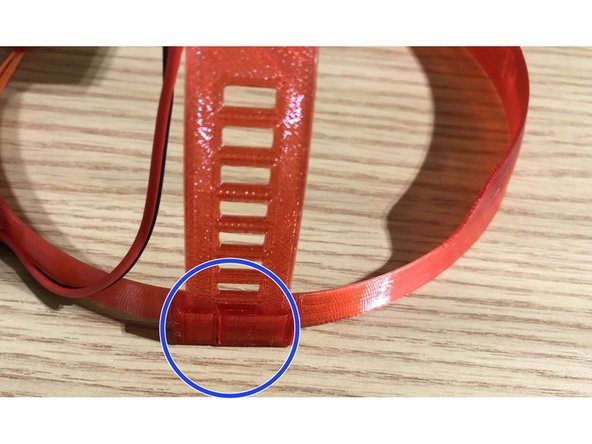
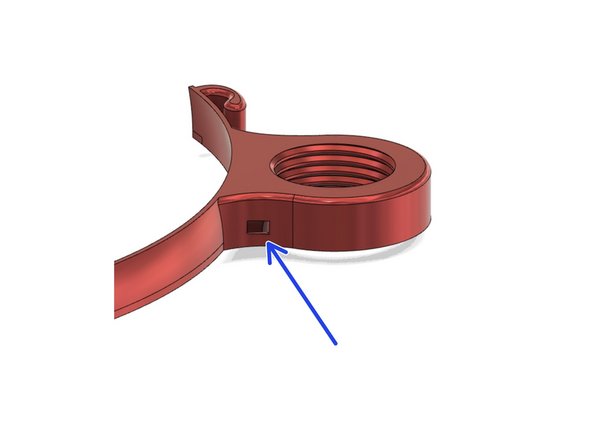
B4 and later Bunny PAPRs have slots that accept the fan bands. Simply insert until band clicks in desired position.
-
-
-
Weave excess fan lead into "frills" of fan mounting band
-
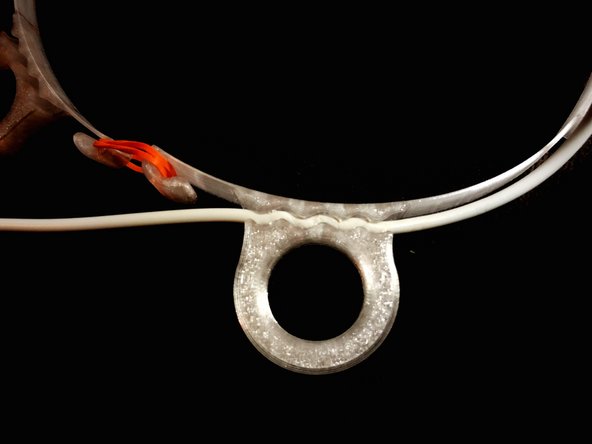
Flex Fit Bunny PAPR has sinuous wire channels molded into its expiratory port "ears." Insert thick cabling into wire channel. Add a piece of wire insulation atop wire if needed to secure cabling
-
Alternatively, zip tie cable to loop. Secure the actual cable itself, not the shrink wrap or fan leads.
-
FLUSH CUTTER is vital safety tool when trimming a zip tie. Diagonal cutters leave a sharp end that can cut users. Flush cutting leaves a safe end.
-
-
-
Verify that the fan runs with either battery or AC adapter.
-
Assembly is complete
-
-
-
For users who need to wear PAPR for over four hours, a few comfort measures are helpful
-
Neoprene foam 2-3 mm thick under fan mount can cushion the top of your head. Passing bolts through the neoprene will hold it in place. https://www.amazon.com/gp/product/B07BKP...
-
Fan noise over prolonged wear can be hard on ones ears. Concert attenuators with limited sound reduction of 19 dB allow me to hear conversations and monitors, but protect my ears. https://www.amazon.com/gp/product/B018WP... Regular ear plugs have too much attenuation of 32-33 dB
-
-
-
You can use a stethoscope by putting it on before the PAPR. Works better with slimmer, long scopes.
-
Put scope on ears and swing it forward of your chin BEFORE putting on PAPR and strap. Then you can reach through bag to put earpieces in/out of ears.
-
Leave stethoscope in diaphragm position. Bell position creates extra air exit path through scope.
-
Alternatively, use wireless, electronic stethoscope if frequent stethoscope usage is required.
-
-
-
This completes guide for the Bunny Science™ PAPR respirator.
-
Build, test, and practice with your Bunny PAPR before clinical need.
-


Cancel: I did not complete this guide.
One other person completed this guide.
Attached Documents
19 Comments
SoundButtonsPro.com is far more than a soundboard it is an essential creative tool and a hub for fun. Users rely on the platform for:
• Enhancing short-form video content
• Adding reactions to livestreams
• Building meme compilations
• Crafting unique audio edits
• Personal amusement and exploration
Soundbuttonspro - Open Reply
The sealed arrangement enables function at much lower air flow rates in the 20 to 30 L/min range. That lower rate remains within range of anesthesia filter, needs less fan power, less battery power. Output ports provide controlled, one way expiratory path unlike conventional PAPR’s.
Jimmy Zahn - Resolved on Release Reply
For those looking to further customize their PAPR systems for efficiency and ease of use, implementing a tg macro can significantly streamline the process.
Rita Olsson - Resolved on Release Reply
A different mr mine thought. You may provide a variety of mounting options on your 3D item to allow you to utilize different blowers (whatever is around and readily accessible).
HaileyCarter - Resolved on Release Reply
Congratulations and thank you Dr Kuo, your design is great and perfect for use in the dental operatory. We get a very large amount of fluid and particulate aerosolization in practice, and although wearing an N95 mask and face shield is helpful, your solution is superior. This is especially true in light of needing to wear surgical loupes.
Do you have a source for the plastic kick liners your hospital uses? I would like to purchase them, and the ones I have found a don’t seem to be the same.
Thanks for all your help, and keep up the great work, it is appreciated!
Roger Oppenheimer - Resolved on Release Reply